Add a comment section to your Next.js blog
I recently created this website and started writing technical blogs. Although I was writing these blogs, they were lacking feedback, so I decided to add a comment section feature.
Now I started thinking about how to implement this. Creating a whole system from scratch would involve a lot of work, integrate a backend, user authentication, database to store the messages, performance optimization and what not. This made me think do I really want a comment section?
After exploring a bit on the internet, I thought why not just plug in a comment widget and use that.
Choosing a comment widget for your site
I came across a lot of comment widgets but most of them were paid. After reading about a lot of them I narrowed it down to two:
Disqus seemed more appealing at the beginning, but when I started reading about it I noticed that the basic free plan comes with advertisement. The Plus plan was $12 a month, since I get no revenue from this website, this didn't make sense to buy.
Giscus on the other hand uses GitHub Discussions for comments and it requires no subscription, no tracking and is ad free. It uses GitHub for sign in, this made a lot more sense to use as my target audience usually should have a GitHub account.
Prerequisites
- Your repository should be on GitHub :)
- The repository should be public
Steps to add Giscus to your blog
If you don't want your repository to be public, I would suggest to go with Disqus. If you want Giscus, you can follow the below steps to add it on your website:
1. Change your repository settings
The first thing to do is to make your repository public. You can go to your repository settings, in general scroll to the bottom and you'll find an option to change the visibility of your repo.
In the same general settings you will find an option for GitHub discussions, enable this feature.

2. Install Giscus in your repo
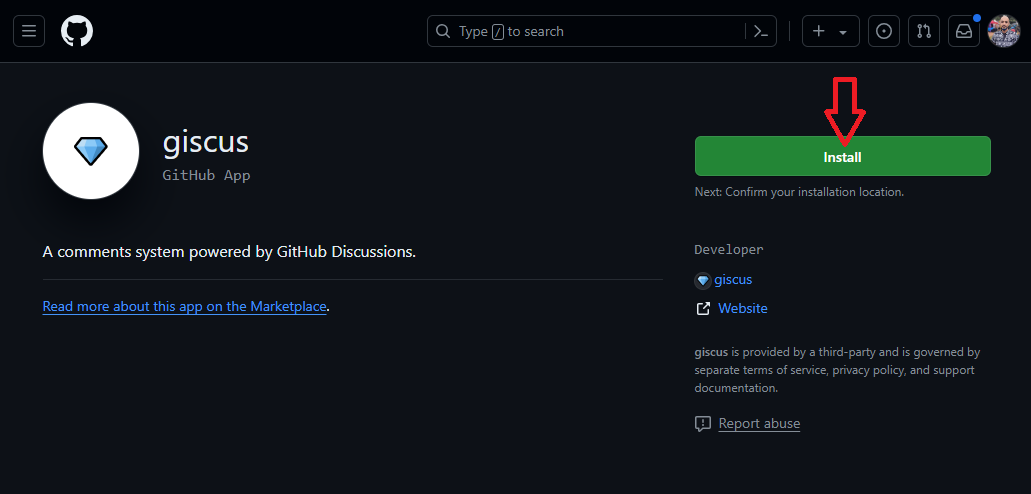
Once you have discussions enabled, you need to install Giscus in your repository. Go to GitHub marketplace and search for Giscus. Install the app.

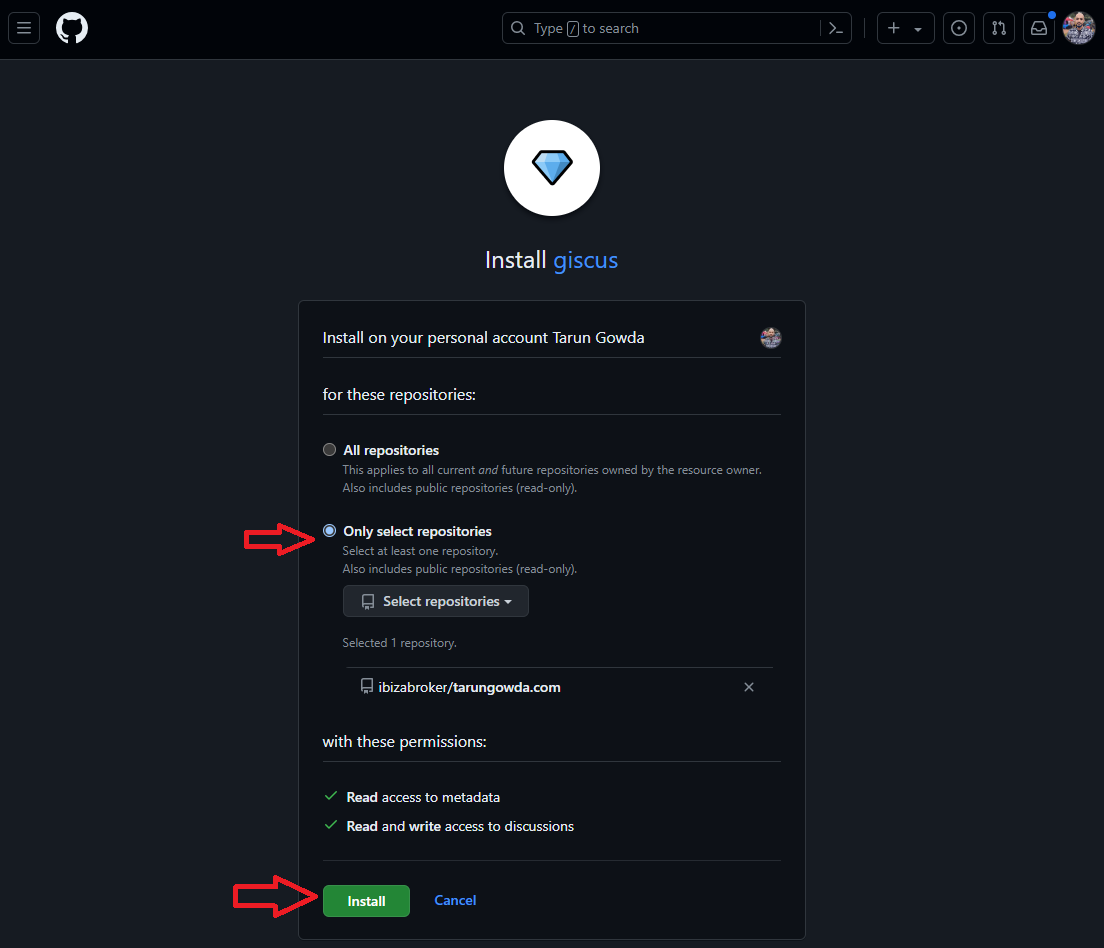
Choose the repository you want to install the giscus app in.

Hit the install button after you've selected the repository you want to install it in.
3. Add Giscus to your website
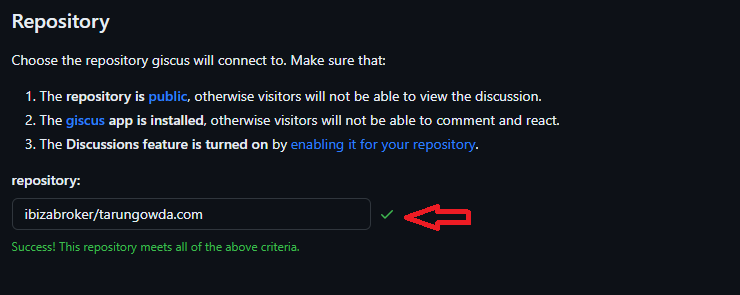
After installing giscus, you have to choose the configurations you want. Go to giscus.app and type in your username/repository-name

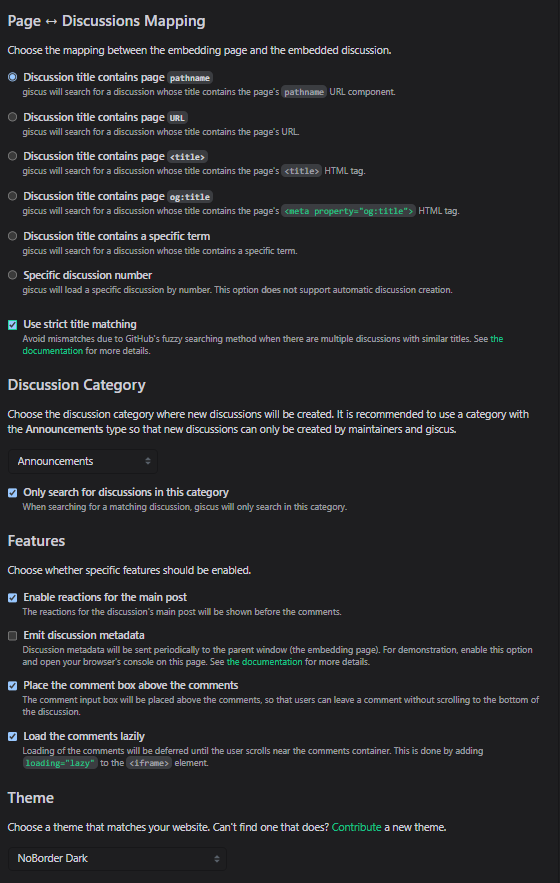
If you get a success message that means everything is working fine till now. Now it's time to configure it on how you want giscus to operate. I used the following configuration:

Note that I've checked on lazy loading, this means the comments will only load when the user scrolls to that destination. This reduces the load on your app.
Once you have selected all the configurations, you will see a script which you can use in your website. If you followed my configurations, you script would look something like this:
<script src="https://giscus.app/client.js"
	data-repo="ibizabroker/tarungowda.com"
	data-repo-id="R_kgDOK6tSrQ"
	data-category="Announcements"
	data-category-id="DIC_kwDOK6tSrc4CfJk9"
	data-mapping="pathname"
	data-strict="1"
	data-reactions-enabled="1"
	data-emit-metadata="0"
	data-input-position="top"
	data-theme="noborder_dark"
	data-lang="en"
	data-loading="lazy"
	crossorigin="anonymous"
	async>
</script><script src="https://giscus.app/client.js"
data-repo="ibizabroker/tarungowda.com"
data-repo-id="R_kgDOK6tSrQ"
data-category="Announcements"
data-category-id="DIC_kwDOK6tSrc4CfJk9"
data-mapping="pathname"
data-strict="1"
data-reactions-enabled="1"
data-emit-metadata="0"
data-input-position="top"
data-theme="noborder_dark"
data-lang="en"
data-loading="lazy"
crossorigin="anonymous"
async>
</script>Now, to add it in your nextjs website. You can directly use the script or just go ahead with the simpler package by Giscus which helps you create your wrapper component.
npm install @giscus/reactnpm install @giscus/reactLet's create a component for it. Since this package uses browser features it will be a client component. The props is the same as your <script> tag, use camelCase and remove data-.
'use client';

import Giscus from "@giscus/react";
import { useTheme } from "next-themes";

export default function GiscusComments() {
  const { resolvedTheme } = useTheme();
  const theme = resolvedTheme === 'light' ? 'noborder_light' : 'noborder_dark';

  return (
    <Giscus
      repo="ibizabroker/tarungowda.com"
      repoId="R_kgDOK6tSrQ"
      category="Announcements"
      categoryId="DIC_kwDOK6tSrc4CfJk9"
      mapping="pathname"
      strict="1"
      reactionsEnabled="1"
      emitMetadata="0"
      inputPosition="top"
      theme={theme}
      lang="en"
      loading="lazy"
    />
  );
}
'use client';
import Giscus from "@giscus/react";
import { useTheme } from "next-themes";
export default function GiscusComments() {
const { resolvedTheme } = useTheme();
const theme = resolvedTheme === 'light' ? 'noborder_light' : 'noborder_dark';
return (
<Giscus
repo="ibizabroker/tarungowda.com"
repoId="R_kgDOK6tSrQ"
category="Announcements"
categoryId="DIC_kwDOK6tSrc4CfJk9"
mapping="pathname"
strict="1"
reactionsEnabled="1"
emitMetadata="0"
inputPosition="top"
theme={theme}
lang="en"
loading="lazy"
/>
);
}Now that your client component is ready, you can use it in your blog. Go to your blog page and import this file.
// ....
import GiscusComments from '@/components/Giscus';

//....

export default async function BlogPage({ params }: { params: Blog }) {
  // ....
  return (
	  <div className='container'>
		  <article className='article'>
		    // ....
		  </article>
		  <div className='comment-section'>
            <GiscusComments />
          </div>
	  </div>
  )
}
// ....
import GiscusComments from '@/components/Giscus';
//....
export default async function BlogPage({ params }: { params: Blog }) {
// ....
return (
<div className='container'>
<article className='article'>
// ....
</article>
<div className='comment-section'>
<GiscusComments />
</div>
</div>
)
}Your comment section should now be visible, once someone comments or adds a reaction to the page, giscus will automatically create a discussion in your repository for that slug based on the pathname, if you selected that in your configuration.
Hope this post was helpful, leave a reaction or a comment if you want to test out how giscus feels.